JWTs look confusing at first because a single token seems to do several jobs at once: it carries identity claims, proves integrity, and travels across requests. The clean way to understand JWT is to treat it as a signed package of claims that another service can verify later.
If you are still building the broader auth model, start with Authentication vs Authorization: What’s the Difference?, JWT vs Session Authentication: Complete Comparison, and What Is REST API? Beginner’s Guide with Examples first. This post focuses on what happens inside the JWT itself and how servers validate it on real requests.
Table of Contents
Open Table of Contents
- Quick Definition
- What a JWT Actually Is
- The 3 Parts of a JWT
- How JWT Is Created Step by Step
- How JWT Authentication Works in a Real Request Flow
- What the Server Must Validate
- Signed JWT vs Encrypted Token
- Access Tokens, Refresh Tokens, and Expiry
- When JWT Is a Good Fit
- Common Mistakes Developers Make
- Interview Questions
- 1. What are the three parts of a JWT?
- 2. Why is a JWT payload not considered secure by itself?
- 3. What does the server need to check before trusting a JWT?
- 4. Why do teams still need server-side state even when they use JWT?
- 5. What is the difference between a signed JWT and an encrypted token?
- 6. When is JWT a better choice than session authentication?
- Conclusion
- References
- YouTube Videos
Quick Definition
- JWT stands for JSON Web Token.
- A JWT usually contains a header, payload, and signature.
- The sender signs the token, and the receiver validates that signature before trusting the claims.
The shortest correct mental model is:
- The auth service creates claims such as user ID, expiry time, and issuer.
- It signs those claims into a compact token string.
- The client sends that token on later requests.
- The API verifies the token before using the claims.
That means JWT is mainly about portable trust, not about hiding secrets.
What a JWT Actually Is
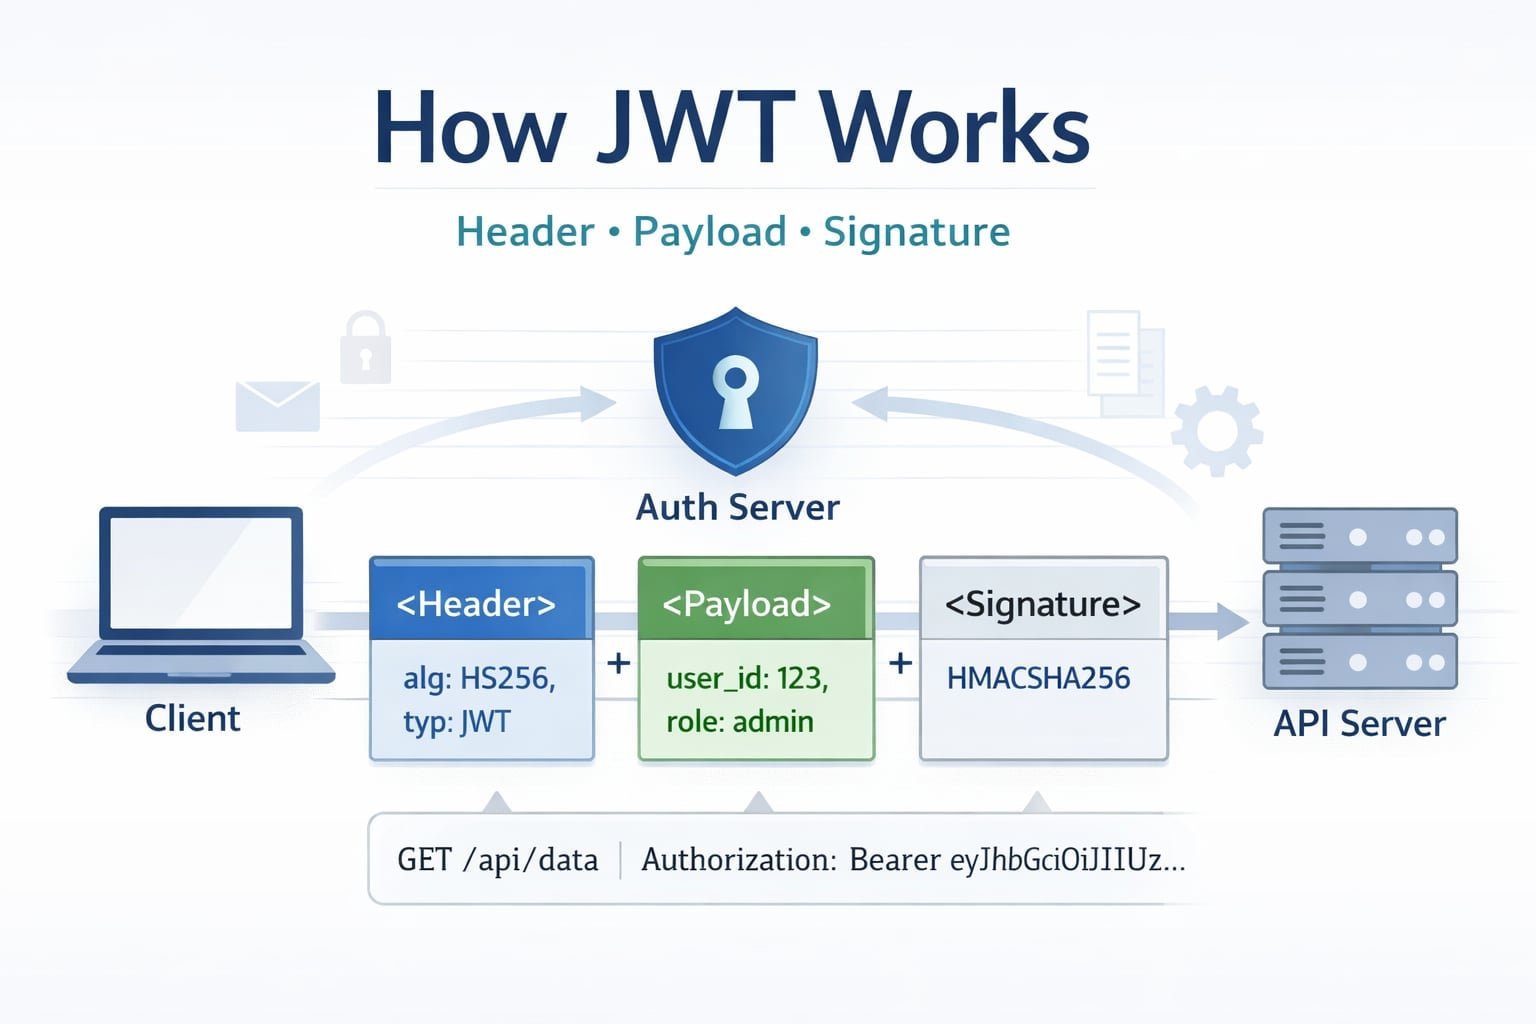
A JWT is a standardized token format defined by the IETF. In the most common case, it is a signed token represented as three dot-separated Base64URL-encoded sections:
header.payload.signatureImportant clarification:
- Base64URL encoding is only an encoding step, not encryption.
- Anyone holding the token can usually decode the header and payload.
- The signature is what stops attackers from changing claims without detection.
That is why teams use JWTs to move identity claims between services, APIs, gateways, and clients. The token is compact enough for HTTP headers and structured enough for predictable validation.
The 3 Parts of a JWT
1. Header
The header describes the token type and signing algorithm.
Typical example:
{
  "alg": "RS256",
  "typ": "JWT"
}
Common fields:
alg: which algorithm signed the token, such asHS256orRS256typ: usuallyJWTkid: optional key identifier used during key rotation
Why it matters:
- The verifier needs to know which validation path to use.
- Key rotation often depends on
kid. - The API must not blindly trust whatever algorithm the token claims.
2. Payload
The payload contains the claims.
Typical example:
{
  "sub": "user_42",
  "iss": "https://auth.adevguide.com",
  "aud": "https://api.adevguide.com",
  "role": "admin",
  "iat": 1774657399,
  "exp": 1774660999
}
Important claims:
sub: subject, often the user IDiss: issuer, the service that created the tokenaud: intended audience, usually the API or service nameexp: expiry timeiat: issued-at timenbf: not-before timejti: token ID, useful for replay protection or revocation lists
What beginners often miss:
- The payload is usually readable.
- It should carry only the minimum claims needed for the next hop.
- Highly sensitive or fast-changing authorization data should not live in a long-lived access token.
3. Signature
The signature proves integrity. It is computed from the encoded header, the encoded payload, and a signing secret or private key.
Conceptually:
signature = Sign(
  base64url(header) + "." + base64url(payload),
  signing_key
)
This is the part that stops an attacker from changing:
role: "user"torole: "admin"sub: "user_42"tosub: "user_7"expto a later timestamp
If the payload changes, the signature check fails.
How JWT Is Created Step by Step
Here is the normal issuance flow:
- User logs in with credentials, SSO, or another trusted identity flow.
- Auth service verifies identity.
- Auth service builds a header.
- Auth service builds a payload with claims such as
sub,iss,aud, andexp. - It Base64URL-encodes header and payload.
- It signs
encodedHeader + "." + encodedPayload. - It returns the final compact token.
flowchart TD
  A[User Login] --> B[Auth Service]
  B --> C{Identity Verified?}
  C -->|No| D[401 Unauthorized]
  C -->|Yes| E[Create Header]
  E --> F[Create Payload Claims]
  F --> G[Base64URL Encode Header and Payload]
  G --> H[Sign Encoded Data]
  H --> I[Return JWT to Client]

  classDef jwt fill:#e8f0fe,stroke:#1565c0,stroke-width:2px,color:#000000;
  class A,B,C,D,E,F,G,H,I jwt;
Example token shape:
eyJhbGciOiJSUzI1NiIsInR5cCI6IkpXVCJ9.
eyJzdWIiOiJ1c2VyXzQyIiwiaXNzIjoiaHR0cHM6Ly9hdXRoLmFkZXZndWlkZS5jb20iLCJhdWQiOiJodHRwczovL2FwaS5hZGV2Z3VpZGUuY29tIiwiZXhwIjoxNzc0NjYwOTk5fQ.
SflKxwRJSMeKKF2QT4fwpMeJf36POk6yJV_adQssw5c
If you want to inspect a token while reading this section, use this JWT decoder.
You do not need to memorize the encoded text. What matters is understanding:
- Header and payload are structured JSON before encoding.
- Encoding makes them transport-friendly.
- Signing makes tampering detectable.
How JWT Authentication Works in a Real Request Flow
After issuance, the client sends the token on later requests, usually in the Authorization header:
GET /api/v1/orders HTTP/1.1
Authorization: Bearer eyJhbGciOiJSUzI1NiIsInR5cCI6IkpXVCJ9...
Typical request flow:
- Client sends the bearer token.
- API gateway or backend extracts the token.
- Server decodes header and payload.
- Server validates signature.
- Server checks claims like
iss,aud,exp, and sometimesnbf. - Server creates request context from trusted claims.
- Business logic still checks current permissions before serving sensitive actions.
flowchart TD
  A[Client Request with Bearer Token] --> B[API Gateway or Backend]
  B --> C[Decode Header and Payload]
  C --> D[Validate Signature]
  D --> E{Claims Valid?}
  E -->|No| F[401 Unauthorized]
  E -->|Yes| G[Build User Context]
  G --> H[Run Authorization Checks]
  H --> I[Return Protected Response]

  classDef flow fill:#e8f5e9,stroke:#2e7d32,stroke-width:2px,color:#000000;
  class A,B,C,D,E,F,G,H,I flow;
This is why JWT is often described as self-contained: the token carries enough information for identity verification without a session lookup on every request. But “self-contained” does not mean “no server checks at all.” Sensitive authorization still needs current backend policy.
If token storage choices still feel blurry on browser apps, compare this with Cookies vs Local Storage vs Session Storage Explained. Storage and token format are related, but they are not the same design decision.
What the Server Must Validate
This is the section many beginner articles oversimplify. A production server should not just decode a token and trust the payload.
Minimum validation checklist:
- Confirm the token structure is valid.
- Confirm the signing algorithm is one you explicitly allow.
- Verify signature with the expected secret or public key.
- Check
expso expired tokens are rejected. - Check
nbfif present. - Check
issso only the right auth server is trusted. - Check
audso the token was actually meant for this API. - Optionally check
jti, token version, or deny-list rules for replay and revocation control.
Illustrative validation logic:
function validateJwt(token, expectedIssuer, expectedAudience, publicKey) {
  const { header, payload, signature } = parseCompactJwt(token);

  if (!["RS256"].includes(header.alg)) {
    throw new Error("Unsupported algorithm");
  }

  if (!verifySignature(header, payload, signature, publicKey)) {
    throw new Error("Invalid signature");
  }

  if (payload.iss !== expectedIssuer) {
    throw new Error("Invalid issuer");
  }

  if (payload.aud !== expectedAudience) {
    throw new Error("Invalid audience");
  }

  if (payload.exp * 1000 <= Date.now()) {
    throw new Error("Token expired");
  }

  return payload;
}
The real lesson is this: decoding is not validation. Parsing JSON and trusting claims is how JWT bugs become incidents.
Signed JWT vs Encrypted Token
Most JWTs you see in web APIs are signed, not encrypted.
What that means:
- Header is readable.
- Payload is readable.
- Integrity is protected by the signature.
- Confidentiality is not provided by default.
That is why you should not put secrets, passwords, private API keys, or sensitive internal state into the payload.
If you truly need the token contents hidden in transit or at rest, you need an encrypted token format such as JWE, not just a plain signed JWT. In most beginner API systems, the better answer is usually:
- Keep the access token payload minimal.
- Put sensitive state on the server.
- Use HTTPS everywhere.
This follows the same principle as HTTP vs HTTPS: What’s the Difference?: transport security and token design have to work together.
Access Tokens, Refresh Tokens, and Expiry
JWT discussions become much clearer when you separate access tokens from refresh tokens.
Access token
- Short-lived
- Sent with normal API requests
- Usually the JWT people mean in tutorials
Refresh token
- Longer-lived
- Used to get a new access token
- Usually needs stronger server-side control and rotation rules
Common production flow:
- User logs in.
- Auth service issues a short-lived JWT access token.
- Client uses it for API calls.
- When it expires, client sends a refresh token to the auth service.
- Auth service verifies refresh-token state and issues a new access token.
Why this split matters:
- Short-lived access tokens limit replay windows.
- Refresh tokens give you a controlled renewal path.
- Revocation becomes more manageable than using one very long-lived JWT.
This is one reason serious systems are not fully stateless even when they use JWTs. Refresh-token rotation, logout, and compromise response usually bring some state back to the server.
When JWT Is a Good Fit
JWT is a strong fit when most of these are true:
- Multiple services need portable identity claims.
- Mobile apps or third-party clients call your APIs.
- You want signatures verified across services without a session lookup on every request.
- Your team can manage expiry, key rotation, and validation rules correctly.
Real-world example:
- An auth service issues short-lived JWT access tokens.
- An API gateway validates them.
- Downstream services trust only claims that the gateway or shared auth library validates.
- Sensitive permission checks still hit current backend policy.
That is why JWT often appears in distributed systems and API platforms. It reduces coupling around identity transport, not around authorization correctness.
Common Mistakes Developers Make
1. Thinking Base64URL means encryption
It does not. Anyone with the token can usually decode header and payload.
2. Trusting decoded claims before verifying signature
This is the most dangerous beginner mistake. Decoding is easy. Validation is the real security boundary.
3. Accepting any algorithm the token asks for
The backend should allow only known algorithms and expected keys. Do not let the token choose your security policy.
4. Putting sensitive data into the payload
JWT payloads should stay minimal because they are usually visible to whoever has the token.
5. Making access tokens live too long
A leaked token that lives for days creates a much larger blast radius than a short-lived token plus controlled refresh flow.
6. Assuming JWT removes the need for authorization checks
JWT can prove identity claims. It does not replace business rules, ownership checks, or current account state validation.
For the broader path around auth and request handling, continue with the Web Fundamentals hub and the API tag archive. They connect JWT internals back to the rest of the series.
Interview Questions
1. What are the three parts of a JWT?
A JWT usually has three parts: header, payload, and signature. The header describes the algorithm and type, the payload contains claims, and the signature proves the header and payload were not changed after signing.
2. Why is a JWT payload not considered secure by itself?
Because the payload is usually only Base64URL-encoded, not encrypted. That means people or systems holding the token can often decode it. The signature protects integrity, not secrecy.
3. What does the server need to check before trusting a JWT?
At minimum, it should verify structure, allowed algorithm, signature, issuer, audience, and expiry. Depending on the system, it may also check nbf, jti, token version, or revocation state.
4. Why do teams still need server-side state even when they use JWT?
Because real auth systems still need refresh-token tracking, logout handling, key rotation, compromise response, and sometimes deny lists or token-version checks. JWT often reduces one kind of state, not all state.
5. What is the difference between a signed JWT and an encrypted token?
A signed JWT protects integrity, meaning tampering is detectable. An encrypted token protects confidentiality, meaning outsiders cannot read the contents. Most beginner JWT examples are signed, not encrypted.
6. When is JWT a better choice than session authentication?
JWT is often a better fit when multiple services, mobile clients, or third-party consumers need portable signed identity claims. Session auth is often simpler for browser-first products that want easier revocation and tighter server control.
Conclusion
JWT works by packaging claims into a compact token, encoding them for transport, and signing them so another service can verify they were not changed. The signature is the security-critical part. The payload is usually readable, so it should stay minimal and non-sensitive.
The cleanest way to remember JWT is:
- Claims are created.
- Claims are encoded.
- Claims are signed.
- APIs validate before trusting them.
If you keep that sequence clear, JWT stops feeling magical and starts looking like a practical identity-transport format with very specific strengths and very specific failure modes.
References
- RFC 7519: JSON Web Token (JWT)
- RFC 7515: JSON Web Signature (JWS)
- RFC 8725: JSON Web Token Best Current Practices
YouTube Videos
- “What Is JWT and Why Should You Use JWT” - Web Dev Simplified
https://www.youtube.com/watch?v=7Q17ubqLfaM - “JWT Authentication Tutorial - Node.js” - freeCodeCamp.org
https://www.youtube.com/watch?v=mbsmsi7l3r4