NemoClaw is NVIDIA’s OpenClaw plugin for OpenShell. In practical terms, it is the security and operations layer that runs an OpenClaw assistant inside a sandbox, routes model calls through NVIDIA-managed inference, and forces operator approval when the agent tries to reach an unknown network destination.
If you already understand what OpenClaw is, how MCP works, or how sub-agents are delegated in Claude Code, NemoClaw is the piece that makes a long-running claw more governable. For more related posts, browse the LLM agents hub and the broader AI Agents category.
As of March 17, 2026, NemoClaw is public, documented, and usable, but NVIDIA’s own repo labels it alpha software. That matters: the setup is real, the commands are real, but you should treat the stack as an early developer platform rather than a settled enterprise standard.
Table of Contents
Open Table of Contents
- What Is NemoClaw?
- Why NemoClaw Exists
- How NemoClaw Fits with OpenClaw and OpenShell
- Current Status as of March 17, 2026
- How to Install and Use NemoClaw
- How Network Approval Works
- How to Switch Models at Runtime
- How to Deploy NemoClaw on a Remote GPU Instance
- Real-World Use Cases
- Limitations and Gotchas
- FAQs
- 1. What problem does NemoClaw solve that plain OpenClaw does not?
- 2. Why does NemoClaw rely on OpenShell instead of enforcing policy inside OpenClaw itself?
- 3. How is operator-approved egress different from a normal allowlist?
- 4. When would you use
nemoclaw onboardinstead ofopenclaw nemoclaw launch? - 5. How would you explain NemoClaw’s model routing design to an interviewer?
- Conclusion
- References
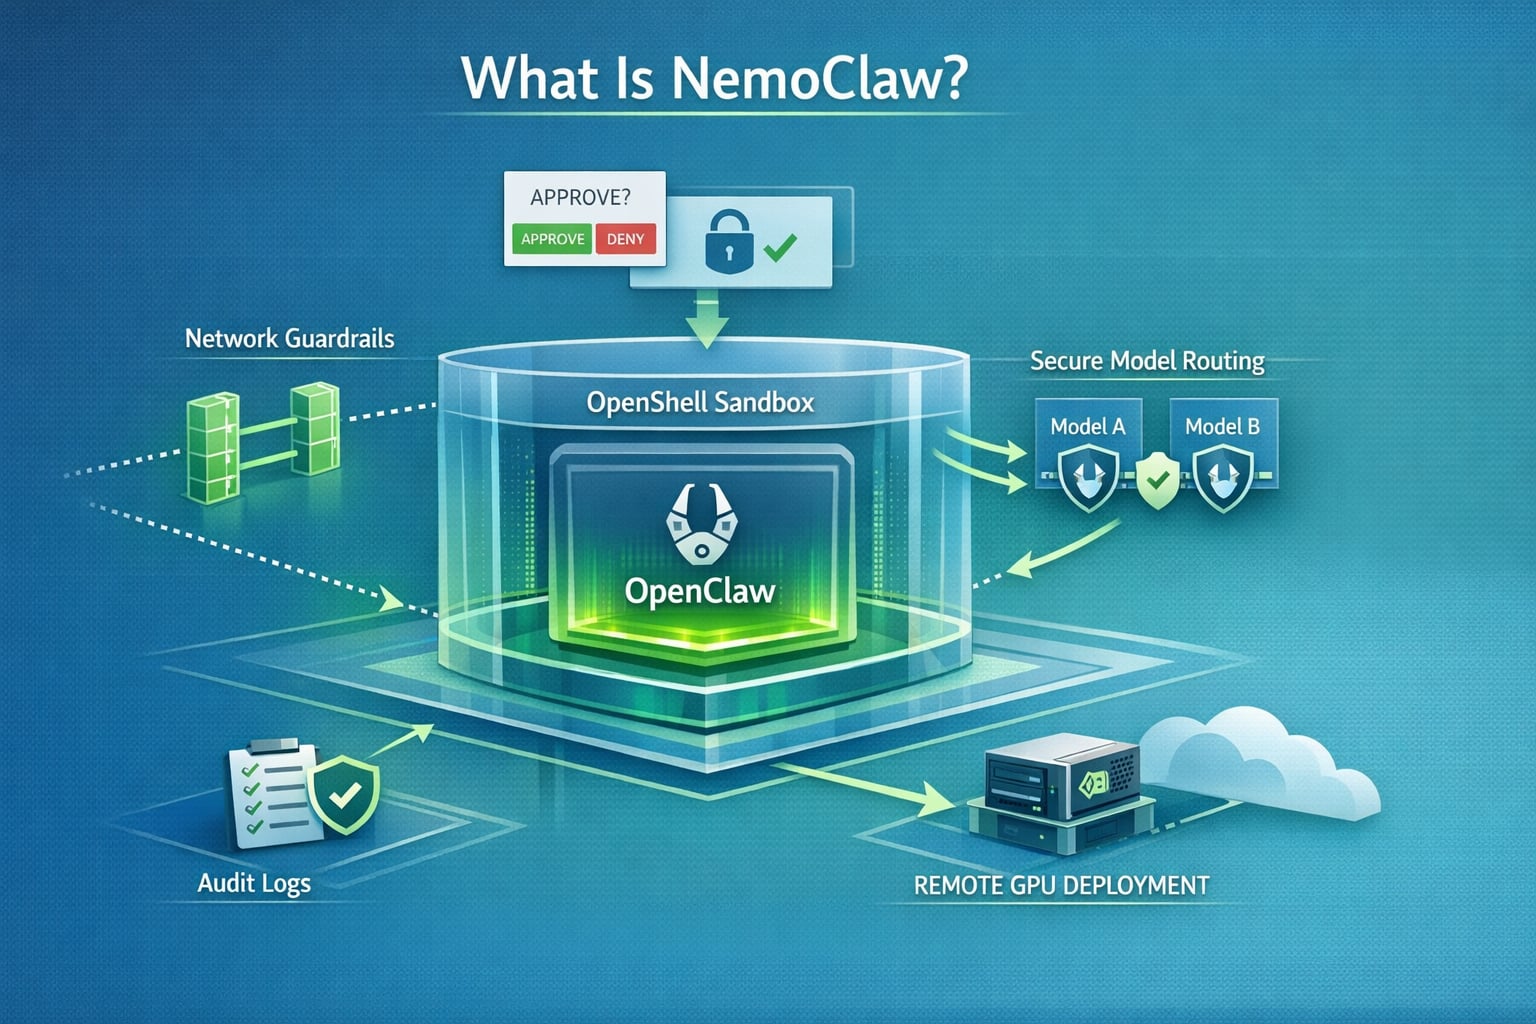
What Is NemoClaw?
The official NVIDIA docs define NemoClaw as the OpenClaw plugin for NVIDIA OpenShell. From the public docs and repo, the cleanest way to think about it is this:
| Layer | What it does |
|---|---|
| OpenClaw | The agent application and user-facing assistant experience |
| NemoClaw | The plugin and host CLI that installs, launches, monitors, and governs a sandboxed OpenClaw instance |
| OpenShell | The secure runtime that enforces sandboxing, network policy, inference routing, and operator approvals |
| NVIDIA cloud inference | The default hosted model path documented today, including Nemotron models via build.nvidia.com |
NemoClaw is not “just another AI agent framework.” It is an opinionated way to run OpenClaw safely:
- It creates a sandbox from the start.
- It applies filesystem and network restrictions from the first boot.
- It keeps the model endpoint behind OpenShell’s routing layer.
- It exposes host commands for lifecycle management, logs, and deployment.
That is the key distinction. Plain OpenClaw gives you an always-on assistant. NemoClaw gives you an always-on assistant with explicit control boundaries.
Why NemoClaw Exists
NVIDIA’s docs are unusually clear about the problem. Autonomous agents can:
- Make arbitrary outbound network calls.
- Touch host files and credentials.
- Call any model endpoint they can reach.
- Keep running long after the human who started them stops paying attention.
That combination creates security, cost, and compliance risk quickly.
NemoClaw exists to reduce that blast radius with four main controls:
- Sandboxed execution OpenClaw runs inside an OpenShell sandbox instead of directly on the host.
- Declarative policy Filesystem and network permissions are defined up front rather than trusted implicitly.
- Operator-approved egress Unknown outbound requests are blocked and surfaced for approval in the OpenShell TUI.
- Controlled inference routing Model requests are routed through the OpenShell gateway instead of letting the agent hit arbitrary endpoints directly.
For teams trying to move from “cool demo” to “something we can leave on overnight,” that is the real value.
How NemoClaw Fits with OpenClaw and OpenShell
flowchart TD
  A[Developer runs nemoclaw onboard] --> B[nemoclaw CLI plugin]
  B --> C[Blueprint runner]
  C --> D[OpenShell gateway and sandbox]
  D --> E[OpenClaw assistant inside sandbox]
  E --> F{Outbound action}
  F -->|Inference| G[NVIDIA cloud model route]
  F -->|Known endpoint| H[Allowed by policy]
  F -->|Unknown endpoint| I[Blocked in OpenShell TUI]
  I --> J[Operator approves or denies]
  J --> H
The NVIDIA docs describe NemoClaw as a thin CLI plus a versioned blueprint. That blueprint is responsible for:
- Creating the sandbox.
- Applying policy.
- Configuring the inference provider.
- Verifying the blueprint artifact before execution.
This design matters because it separates the developer-facing command layer from the orchestration logic. In other words, the nemoclaw CLI is small and stable, while the blueprint can evolve faster underneath it.
Current Status as of March 17, 2026
Here is the accurate state of the stack right now:
- Public and documented: NVIDIA has a live developer guide and a public GitHub repo for NemoClaw.
- Alpha, not production-ready: NVIDIA’s repo explicitly says to expect rough edges and warns that interfaces and behavior may change.
- Linux-first quickstart: The GitHub quickstart currently documents Ubuntu 22.04+ with Node.js, npm, Docker, and OpenShell.
- Fresh OpenClaw install expected: The current quickstart notes that NemoClaw requires a fresh OpenClaw installation.
- Host CLI is the primary interface: The plugin commands under
openclaw nemoclawexist, but the docs say they are still under active development.
One important inference from the public docs: the fully documented developer path today centers on NVIDIA cloud inference, especially Nemotron models through build.nvidia.com. NVIDIA may broaden this over time, but that broader path is not the main public quickstart yet.
How to Install and Use NemoClaw
1. Prepare the environment
The current documented quickstart expects:
- Ubuntu 22.04 LTS or newer
- Node.js 20+ and npm 10+
- Docker installed and running
- OpenShell installed
- An NVIDIA API key for hosted inference
If you are evaluating the stack for a workstation or lab box, check those basics first. NemoClaw is not currently presented as a frictionless “click once on any laptop” setup.
2. Install NemoClaw
The quickest documented install path is:
curl -fsSL https://nvidia.com/nemoclaw.sh | bashNVIDIA’s command reference also says that npm install -g nemoclaw installs both command interfaces:
npm install -g nemoclawIf you want the shortest path to a working sandbox, use the installer script. If you want to inspect the package and manage it with npm, the package install is the clearer route.
3. Run the onboarding wizard
nemoclaw onboardThis is the most important command in the whole stack. According to the docs, the wizard:
- Creates the OpenShell gateway
- Registers inference providers
- Builds the sandbox image
- Creates the sandbox
- Prompts for your
NVIDIA_API_KEY - Stores credentials in
~/.nemoclaw/credentials.json
4. Connect to the sandbox
After the wizard completes, NVIDIA’s quickstart shows commands like these:
nemoclaw my-assistant connect
nemoclaw my-assistant status
nemoclaw my-assistant logs --follow
The default example sandbox name is my-assistant. If you choose a different name during onboarding, replace it consistently.
5. Talk to the agent
Once connected, you have two practical ways to use the assistant.
Interactive chat via the OpenClaw TUI:
openclaw tuiSingle prompt via the OpenClaw CLI:
openclaw agent --agent main --local -m "hello" --session-id testThat second command is useful for smoke tests, CI-like checks, or debugging inference without sitting in the TUI.
6. Check health and logs
Use the host-side commands when you want operational health:
nemoclaw my-assistant status
nemoclaw my-assistant logs --follow
Use the plugin-side commands when you want structured sandbox or blueprint details:
openclaw nemoclaw status --json
openclaw nemoclaw logs -f
The split is intentional:
nemoclawmanages the host lifecycle.openclaw nemoclawreports what the plugin knows about the sandbox from inside the OpenClaw context.
How Network Approval Works
This is the feature that makes NemoClaw different from a normal AI assistant install.
Open the OpenShell terminal UI:
openshell termWhen the agent tries to reach a host that is not already allowed by policy:
- OpenShell blocks the request.
- The TUI shows the host, port, and binary that made the request.
- You approve or deny it.
- If approved, the endpoint is added to the running session policy.
Two details matter operationally:
- Session approvals are temporary. They stay active until the sandbox stops.
- They are not persisted automatically. If you want a permanent allowlist change, edit the policy or apply one explicitly.
For permanent changes, the docs point to two practical approaches:
nemoclaw onboard
openshell policy set <policy-file>
The first recreates the sandbox with updated policy inputs. The second applies a policy update to a running sandbox.
How to Switch Models at Runtime
The default public profile uses NVIDIA cloud inference with:
nvidia/nemotron-3-super-120b-a12bNVIDIA’s inference profile docs also list other available Nemotron-family models, including:
nvidia/llama-3.1-nemotron-ultra-253b-v1nvidia/llama-3.3-nemotron-super-49b-v1.5nvidia/nemotron-3-nano-30b-a3b
To change models without restarting the sandbox:
openshell inference set --provider nvidia-nim --model nvidia/llama-3.3-nemotron-super-49b-v1.5That change takes effect immediately. This is a strong design choice because it separates agent state from model routing. You can test a cheaper or stronger model without rebuilding the full environment.
How to Deploy NemoClaw on a Remote GPU Instance
NemoClaw also supports remote deployment through Brev.
Prerequisites from the docs:
- Brev CLI installed and authenticated
- NVIDIA API key
- NemoClaw installed locally
Deployment is intentionally short:
nemoclaw deploy my-gpu-boxAccording to NVIDIA’s guide, that remote flow:
- Provisions the VM
- Installs Docker and the NVIDIA Container Toolkit if a GPU is present
- Installs OpenShell
- Runs the NemoClaw setup
- Starts auxiliary services such as the Telegram bridge and cloudflared tunnel
To monitor a remote sandbox:
ssh my-gpu-box 'cd /home/ubuntu/nemoclaw && set -a && . .env && set +a && openshell term'If you want a persistent claw that lives outside your laptop, this is the path that matters most.
Real-World Use Cases
1. Always-on coding assistant with outbound controls
A developer wants an OpenClaw assistant that can use GitHub, npm, and docs sites, but should not be able to call arbitrary endpoints. NemoClaw’s baseline policy plus openshell term approvals fit that scenario well.
2. Safe agent staging before broader rollout
A platform team wants to test an agent’s behavior before giving it access to internal APIs. Running it first in NemoClaw makes the approval surface visible. You can see what domains the agent actually wants, rather than what you guessed it might need.
3. Remote GPU-backed assistant for long sessions
A team wants a persistent assistant on a remote A100-backed box rather than tying up a local workstation. nemoclaw deploy <instance-name> is built for that workflow.
4. Model experimentation without rebuilding the environment
You can keep the same sandbox and switch model routes at runtime. That makes it easier to test latency, cost, and quality trade-offs without constantly recreating the agent environment.
Limitations and Gotchas
NemoClaw is promising, but the current public state has real constraints:
- It is explicitly alpha software.
- The GitHub quickstart is currently Ubuntu-focused.
- The docs say it requires a fresh OpenClaw install.
- The
openclaw nemoclawplugin commands are still under active development. - The fully documented path today is centered on NVIDIA cloud inference, not a broad local-model matrix.
That means NemoClaw is best suited right now for:
- Platform engineers
- AI infra teams
- Power users who already understand OpenClaw and sandboxing
It is not yet the easiest entry point for someone who just wants a weekend side project assistant.
FAQs
1. What problem does NemoClaw solve that plain OpenClaw does not?
Answer: OpenClaw gives you the assistant experience. NemoClaw adds the runtime controls that matter when the assistant is long-running and semi-autonomous. The NVIDIA docs call out the core risks directly: arbitrary network access, host filesystem access, and unconstrained model endpoint usage.
In practice, that means NemoClaw solves the governance problem. It lets you say, “The agent may exist, but only inside this sandbox, only with these egress rules, and only with operator approval for unknown destinations.” That is a very different operational posture from running an agent directly on the host.
2. Why does NemoClaw rely on OpenShell instead of enforcing policy inside OpenClaw itself?
Answer: Because runtime isolation is stronger when it sits below the agent application. If OpenClaw enforced its own rules, the assistant and the enforcement mechanism would live at the same layer. That is fragile.
By using OpenShell, NVIDIA separates concerns:
- OpenClaw handles the assistant workflow.
- NemoClaw handles orchestration.
- OpenShell handles isolation, policy, and inference routing.
That architecture reduces trust in the assistant itself and moves the real guardrails into the runtime.
3. How is operator-approved egress different from a normal allowlist?
Answer: A normal allowlist is static. You define the destinations in advance and hope you predicted correctly. Operator-approved egress is dynamic. Unknown hosts are blocked and surfaced to a human in real time through openshell term.
This gives you two advantages. First, you do not have to start with a huge permissive policy. Second, you can learn the actual behavior of the agent before turning those approvals into permanent policy. That is a cleaner security workflow for early deployment and debugging.
4. When would you use nemoclaw onboard instead of openclaw nemoclaw launch?
Answer: Use nemoclaw onboard as the primary setup path. NVIDIA’s docs position it as the main wizard for gateway creation, inference provider registration, image building, sandbox creation, and credential setup.
Use openclaw nemoclaw launch only when you explicitly want the plugin-driven bootstrap from inside the OpenClaw workflow, and even then the docs warn that this path is still developing. For most users today, the host-side nemoclaw CLI is the safer choice.
5. How would you explain NemoClaw’s model routing design to an interviewer?
Answer: The short version is: the agent does not call the model endpoint directly. OpenShell intercepts inference calls and routes them to the configured provider. That makes the model path part of infrastructure policy rather than application behavior.
This matters because it improves control. You can rotate models, switch cost-performance tiers, and inspect the active route without restarting the sandbox. It also keeps model credentials and outbound policy under infrastructure control instead of burying them inside the agent code path.
Conclusion
NemoClaw is best understood as NVIDIA’s secure OpenClaw operating layer. It packages OpenClaw into an OpenShell sandbox, routes inference through controlled providers, and makes network expansion an explicit operator decision instead of a silent default.
That makes the answer to “what is NemoClaw?” fairly simple:
- OpenClaw is the assistant.
- OpenShell is the secure runtime.
- NemoClaw is the glue and control plane that makes the assistant safer to run.
And the answer to “how do you use it?” is equally practical:
- Install it.
- Run
nemoclaw onboard. - Connect to the sandbox.
- Chat through
openclaw tuior the CLI. - Watch and approve network behavior with
openshell term. - Switch models or deploy to Brev when needed.
If NVIDIA keeps shipping quickly here, NemoClaw could become an important reference design for how always-on AI agents should be deployed: not as unchecked processes on the host, but as managed workloads with observable policy boundaries.